CSS 3 บันทึกส่วนตัว
CSS Syntax

วิธีการใส่ CSS มี 3 รูปแบบ
- ใส่ไปที่ Tag โดยตรง ใส่<H1 style=”background: red;”>เนื้อหาข้อความที่เราจะใส่<H1>
<!DOCTYPE html>
<html>
     <head> <!-- ส่วนหัว  -->
      <meta charset=”utf-8”>
       <meta name=”viewport” content=”width=device-width,initial-scale=1”>
      <title>ไตเติ้ลด้านบน</title>
     </head>
<body>
     <H1 style="background: red;">เนื้อหาข้อความที่เราจะใส่<H1>
</body>
</html>
<!-- คอมเม้นข้อความ  -->
2 .ใส่ <style>ใส่คำสั่ง CSS ใว้ในนี้</style> ใส่ใว้ใน
<!DOCTYPE html>
<html>
<head>
    <style>
    body {  /*ให้ background-color ของ body เป็นสี lightblue*/
        background-color: lightblue;
    }

    h1 {    /*ให้ h1  เป็นสี white และอยู่กึ่งกลาง */
        color: white;
        text-align: center;
    }

    p { /*ให้ p  ฟอน verdana และขนาด 20px */
        font-family: verdana;
        font-size: 20px;
    }
    </style>
</head>
<body>
    <h1>My First CSS Example</h1>
    <p>This is a paragraph.</p>
</body>
</html>
3. เขียนไฟล์แยก และลิ้งไปหา
<link rel=“stylesheet“ href=“css/style.css“> เราเขียนไฟ CSS ใว้ในโฟร์เดอร์ชื่อ css ชื่อไฟล์ style.css
ส่วนที่ 1 ไฟล์ HTML
<!DOCTYPE html>
<html>
<head>
    <link rel="stylesheet" href="mystyle.css">
</head>
<body>
<h1>This is a heading</h1>
<p>This is a paragraph.</p>
</body>
</html>
ส่วนที่ 2 ไฟล์ CSS ชื่อไฟล์ mystyle.css
body {
  background-color: lightblue;
}
h1 {
  color: navy;
  margin-left: 20px;
}
การชี้ไปที่ Tag โดยตรง
<!DOCTYPE html>
<html>
<head>
<style>
    body {  /** ชี้ไปที่ body ให้ทำ CSS ในปีกกา */
        background-color: lightblue;
    }
    h1 {    /** ชี้ไปที่ h1 ให้ทำ CSS ในปีกกา */
        color: white;
        text-align: center;
    }
    p {     /** ชี้ไปที่ p ให้ทำ CSS ในปีกกา */
        font-family: verdana;
        font-size: 20px;
    }
</style>
</head>
<body>
<h1>My First CSS Example</h1>
<p>This is a paragraph.</p>
</body>
</html>
การชี้ไปที่ ID ใน Tag ที่จะใส CSS
<!DOCTYPE html>
<html>
<head>
<style>
    #para1 {    /** ใช้ # นำหน้าเพื่อเรียก id  */
        text-align: center;
        color: red;
    }
</style>
</head>
<body>
<p id="para1">Hello World!</p>
<p>This paragraph is not affected by the style.</p>
</body>
</html>
การชี้ไปที่ Class ที่จะใส CSS
<!DOCTYPE html>
<html>
<head>
<style>
    .center {   /** ใช้ . นำหน้าเพื่อชี้ไปที่ คลาสชื่อ center */
        text-align: center;
        color: red;
    }
</style>
</head>
<body>
<h1 class="center">Red and center-aligned heading</h1>
<p class="center">Red and center-aligned paragraph.</p>
</body>
</html>
ชี้ไปที่ Tag และและต่อด้วย Class
<!DOCTYPE html>
<html>
<head>
<style>
    p.center {  /** ชี้ไปที่ Tag p และคลาส center*/
        text-align: center;
        color: red;
    }
</style>
</head>
<body>
<h1 class="center">This heading will not be affected</h1>
<p class="center">This paragraph will be red and center-aligned.</p>
</body>
</html>
ชี้ให้ทุกตัวมีผลใช้ *
<html>
<head>
<style>
    * { /** ใช้ * นำหน้าเพื่อให้ทั้งหมดทำในวงเล็บ */
        text-align: center;
        color: blue;
    }
</style>
</head>
<body>
<h1>Hello world!</h1>
<p>Every element on the page will be affected by the style.</p>
<p id="para1">Me too!</p>
<p>And me!</p>
</body>
</html>
<!DOCTYPE html>
<html>
<head>
<style>
    h1, h2, p {     /** สามารถรวมหลาย Tag แล้วเขียน CSS พร้อมกันได้เลย  */
    text-align: center;
    color: red;
    }
</style>
</head>
<body>
<h1>Hello World!</h1>
<h2>Smaller heading!</h2>
<p>This is a paragraph.</p>
</body>
</html>
CSS Fonts
<!DOCTYPE html>
<html>
<head>
    <style>
        p.impact {  /** ให้ Tag p ใน class ชื่อ impact ทำในวงเล็บ*/
        font-family: Impact, Charcoal, sans-serif; /** ให้ฟอร์นในคลาสเป็น Charcoal */
        }
    </style>
</head>
<body>
    <h1>CSS font-family</h1>
    <p class="impact">This is a paragraph, shown with the Impact font.</p>
</body>
</html>
CSS :hover Selector เมื่อนำเมาส์ไปวางจะเกิดเหตุการณ์ และสามารถทำเมนูแบบดรอปดาวได้
<!DOCTYPE html>
<html>
<head>
<style>
a:hover {
  background-color: yellow;
}
</style>
</head>
<body>
<a href="https://www.w3schools.com">w3schools.com</a>
<a href="https://www.wikipedia.org">wikipedia.org</a>
<p><b>Note:</b> The :hover selector style links on mouse-over.</p>
</body>
</html>
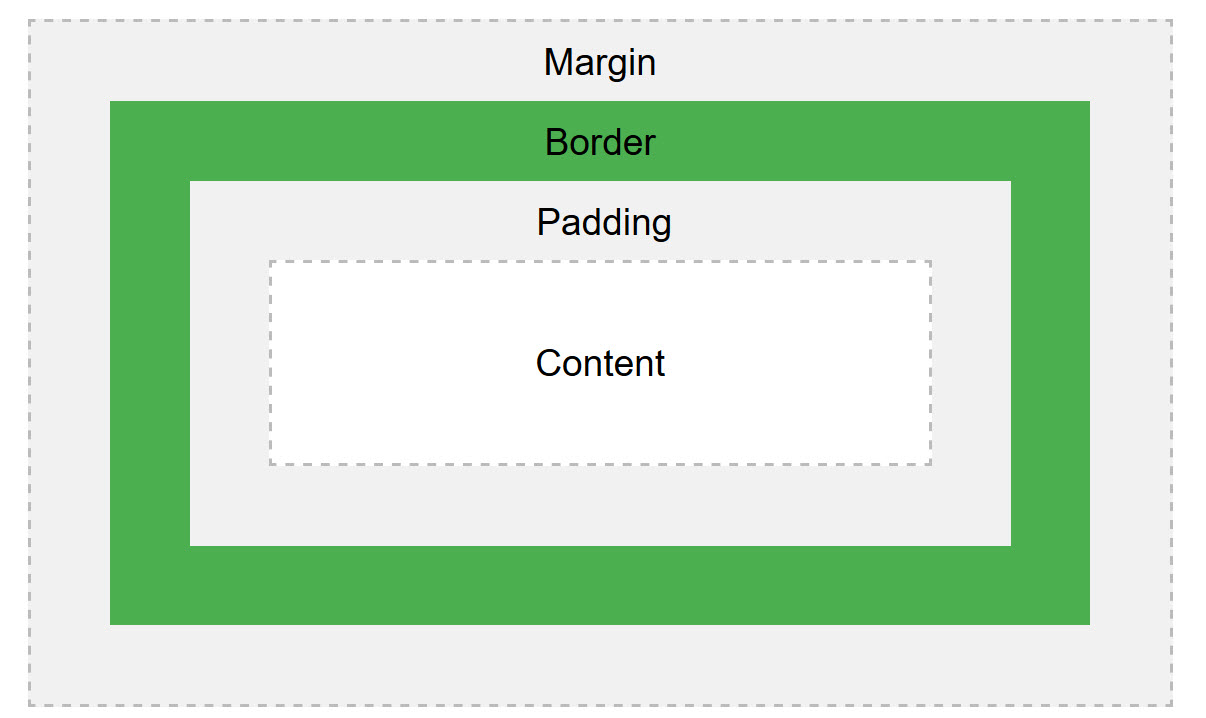
CSS Box Model
<!DOCTYPE html>
<html>
<head>
<style>
div {
  background-color: lightgrey;
  width: 300px;
  border: 15px solid green;
  padding: 50px;
  margin: 20px;
}
</style>
</head>
<body>
<h2>Demonstrating the Box Model</h2>
<p>The CSS box model is essentially a box that wraps around every HTML element. It consists of: borders, padding, margins, and the actual content.</p>
<div>This text is the content of the box. We have added a 50px padding, 20px margin and a 15px green border. Ut enim ad minim veniam, quis nostrud exercitation ullamco laboris nisi ut aliquip ex ea commodo consequat. Duis aute irure dolor in reprehenderit in voluptate velit esse cillum dolore eu fugiat nulla pariatur. Excepteur sint occaecat cupidatat non proident, sunt in culpa qui officia deserunt mollit anim id est laborum.</div>
</body>
</html>
กล่องสามารถสร้างได้หลายกล่อง โดยใช้ <div></div> หลาย Tag

CSS position Property
- static Default value
- absolute
- fixed
- relative
- sticky
- initial
- inherit
CSS z-index Property การทับซ้อนของ Layer
- auto Default value
- number
- initial
- inherit
z-index: -1;
CSS Flexbox เป็นการจัดการ ตู้คอนเทนเนอร์
แกนหลักจะมี 2 แบบ คือ แนวนอน กับ แนวตั้ง ส่วนใหญ่ใช้แนวนอน
จะทำการสร้าง ตู้คอนเทนเนอร์ และเอากล่องมาใส่ภายในอีกที
รวมมคำสั้ง CSS
align-items: center; จัดการแนวแกนตั้ง Vertical Align
background-color: Orange; พื้นหลังสีส้ม
background-image: url(“paper.gif”); ใส่รูปพื้นหลัง
border: 1px solid black; ให้มีกรอบหนะ 1px และ solid คือกรอบที่เป็นเส้นทึบ และมีสีดำ
border-radius: 25px; ให้กรอบมีเส้นโค้งมล 25px
border: 2px solid Violet; กรอบตัวอักษร 2px กรอบที่เป็นเส้นทึบ และมีสีม่วง
box-shadow: 5px 10px; ใส่เงา
box-shadow: 5px 10px 15px; ใส่เงา
box-shadow: 5px 10px #888888; ใส่เงา ใส่สี
color:MediumSeaGreen; ตัวอักษรสีเขียว
font-family: Impact, Charcoal, sans-serif; ให้ฟอร์นในคลาสเป็น Charcoal
font-size: 40px; ให้ฟอร์น มีขนาด 40px
font-size: 2.5em; /* 40px/16=2.5em */
font-weight: bold; ให้ฟอร์น เป็นตัวหนา
font-weight: 900; ให้ฟอร์น เป็นตัวหนา 900
line-height: 10px; ระยะห่างระหว่างบรรทัด
text-align: center; ให้ฟอร์นอยู่ตรงกลาง
width: 150px; ความกว้าง 150px
width: 100%; ความกว้าง 100% เต็มพื้นที่ที่มันอยู่
z-index: -1; กำหนดตำแหน่งของกล่อง
การนำฟอร์น Google มาใส่
<!DOCTYPE html>
<html>
<head>
<link rel="stylesheet" href="https://fonts.googleapis.com/css?family=Sofia">
<style>
body {
  font-family: "Sofia";
  font-size: 22px;
}
</style>
</head>
<body>
<h1>Sofia Font</h1>
<p>Lorem ipsum dolor sit amet, consectetuer adipiscing elit.</p>
</body>
</html>
การดึงไอคอนจาก boxicons มาใส่
<link rel="stylesheet" href="https://unpkg.com/boxicons@latest/css/boxicons.min.css">